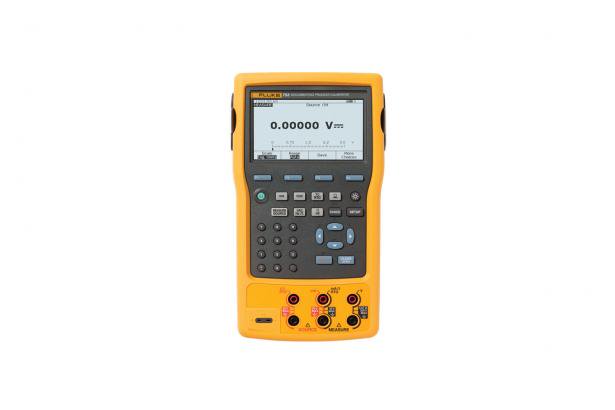
753 Documenting Process Calibrator, Non Bus
(Fluke Registration required before purchase. Please contact Laserman for more information on +61 8 9335 1718 )
(item no. 3977641)
Fluke 753 Documenting Process Calibrator helps you work smarter and faster
The Fluke 753 is a powerful multifunction documenting calibrator that lets you download procedures, lists, and instructions created with software, and upload data for printing, archiving, and analysis. You'll find it does the work of several tools, with simultaneous source and measurement capabilities for all common process parameters. It sources, simulates, and measures pressure, temperature, and electrical signals in one rugged, hand-held calibration tool. It also automates calibration procedures, captures data for documentation, and helps you meet rigorous standards like ISO 9000, FDA, EPA, and OSHA regulations.
The 753 includes a USB interface and a USB communication cable to enable two-way communication with DPCTrack 2 and other instrumentation management applications. To create a seamless/paperless calibration management system consider adding Fluke DPCTrack2 Calibration Management software for use with your Fluke 753 and 754 or even legacy Fluke 743 and 744 calibrators.
Features
- Full-featured documenting process calibrator for calibrating and troubleshooting
- Measures volts, mA, RTDs, thermocouples, frequency, and ohms to test sensors, transmitters and other instruments
- Sources and simulate volts, mA, pressure, thermocouples, RTDs, frequency, ohms, and pressure to calibrate transmitters
- Powers transmitters during test using loop supply with simultaneous mA measurement
- Measures and sources pressure using any of 50 Fluke 700Pxx Pressure Modules
- Allows you to creates and run automated as-found/as-left procedures to satisfy quality programs or regulations, and record and document results
- Holds up to a full week of downloaded procedures and calibration results
- Offers many flexible features like autostep, custom units, user-entered values during test, one-point and two-point switch testing, square root DP flow testing, programmable measurement delay and more.
- Offers compatibility with DPCTrack2 and many other asset management software packages
- Bright white dual display for reading both sourced and measured parameters simultaneously
- Easy-to-use multi-lingual interface
- Gas gauge and rechargeable Li-Ion battery for 10 hour uninterrupted use
- Comes with three-year warranty and DPC/Track trial software
Specifications: Fluke 753 Documenting Process Calibrator
| Measurement Accuracy | |||||
| Voltage DC | Range /Resolution | 1 Year | 2 Years | ||
| 100.000 mV | 0.02% + 0.005 mV | 0.03% + 0.005 mV | |||
| 3.00000 V | 0.02% + 0.00005 V | 0.03% + 0.00005 V | |||
| 30.0000 V | 0.02% + 0.0005 V | 0.03% + 0.0005 V | |||
| 300.00 V | 0.05% + 0.05 V | 0.07% + 0.05 V | |||
| Voltage AC | 3.000 V (40 Hz to 500 Hz) / 0.001 V | 0.5% + 0.002 V | 1.0% + 0.004 V | ||
| 30.00 V (40 Hz to 500 Hz) / 0.01 V | 0.5% + 0.02 V | 1.0% + 0.04 V | |||
| 300.0 V (40 Hz to 500 Hz) / 0.1 V | 0.5% + 0.2 V | 1.0% + 0.2 V | |||
| Current DC | 30.000 mA | 0.01% + 5 uA | 0.015% + 7 uA | ||
| 110.00 mA | 0.01% + 20 uA | 0.015% + 30 uA | |||
| Resistance | 10.000 Ω | 0.05% + 50 mΩ | 0.07% + 70 mΩ | ||
| 100.00 Ω | 0.05% + 50 mΩ | 0.07% + 70 mΩ | |||
| 1.0000 kΩ | 0.05% + 500 mΩ | 0.07% + 0.5 Ω | |||
| 10.000 kΩ | 0.1% + 10 Ω | 0.15% + 15 Ω | |||
| Frequency | 1.00 to 110.00 Hz / 0.01 Hz | 0.05 Hz | |||
| 110.1 to 1100.0 Hz / 0.1 Hz | 0.5 Hz | ||||
| 1.101 to 11.000 kHz / 0.001 kHz | 0.005 kHz | ||||
| 11.01 to 50.00 kHz / 0.01 kHz | 0.05 kHz | ||||
| Source Accuracy | |||||
| 1 Year | 2 Years | ||||
| Voltage DC | 100.000 mV | 0.01% + 0.005 mV | 0.015% + 0.005 mV | ||
| 1.00000 V | 0.01% + 0.00005 V | 0.015% + 0.0005 V | |||
| 15.0000 V | 0.01% + 0.0005 V | 0.015% + 0.0005 V | |||
| Current DC | 22.000 mA (source) | 0.01% + 0.003 mA | 0.02% + 0.003 mA | ||
| Current sink (simulate) | 0.02% + 0.007 mA | 0.04% + 0.007 mA | |||
| Resistance | 10.000 Ω | 0.01% + 10 mΩ | 0.015% + 15 mΩ | ||
| 100.00 Ω | 0.01% + 20 mΩ | 0.015% + 30 mΩ | |||
| 1.0000 kΩ | 0.02% + 0.2 Ω | 0.03% + 0.3 Ω | |||
| 10.000 kΩ | 0.02% + 3 Ω | 0.03% + 5 Ω | |||
| Frequency | 0.1 to 10.99 Hz | 0.01 Hz | |||
| 0.01 to 10.99 Hz | 0.01 Hz | ||||
| 11.00 to 109.99 Hz | 0.1 Hz | ||||
| 110.0 to 1099.9 Hz | 0.1 Hz | ||||
| 1.100 to 21.999 kHz | 0.002 kHz | ||||
| 22.000 to 50.000 kHz | 0.005 kHz | ||||
| Technical Data | |||||
| Data log functions | Measure functions | Voltage, current, resistance, frequency, temperature, pressure | |||
| Reading rate | 1, 2, 5, 10, 20, 30, or 60 readings/minute | ||||
| Maximum record length | 8000 readings (7980 for 30 or 60 readings/minute) | ||||
| Ramp functions | Source functions | Voltage, current, resistance, frequency, temperature | |||
| Rate | 4 steps/second | ||||
| Trip detect | Continuity or voltage (continuity detection not available when sourcing current) | ||||
| Loop power function | Voltage | Selectable, 26 V | |||
| Accuracy | 10%, 18 V minimum at 22 mA | ||||
| Maximum current | 25 mA, short circuit protected | ||||
| Maximum input voltage | 50 V DC | ||||
| Step functions | Source functions | Voltage, current, resistance, frequency, temperature | |||
| Manual step | Selectable step, change with arrow buttons | ||||
| Autostep | Fully programmable for function, start delay, stepvalue, time per step, repeat | ||||
| Environmental Specifications | |||||
| Operating temperature | -10°C to +50°C | ||||
| Storage temperature | -20°C to +60°C | ||||
| Dust/water resistance | Meets IP52, IEC 529 | ||||
| Operating altitude | 3000 m above mean sea level (9842 ft) | ||||
| Safety Specifications | |||||
| Agency approvals | CAN/CSA C22.2 No 1010.1-92, ASNI/ISA S82.01-1994, UL3111, and EN610-1:1993 | ||||
| Mechanical and General Specifications | |||||
| Size | 136 x 245 x 63 mm (5.4 x 9.6 x 2.5 in) | ||||
| Weight | 1.2 kg (2.7 lb) | ||||
| Batteries | Internal Battery Pack Li-ion: 7.2 V, 4400 mAh, 30 Wh | ||||
| Battery life | > 8 hours typical | ||||
| Battery replacement | Via snap-shut door without opening calibrator; no tools required | ||||
| Side port connections | Pressure module connector | ||||
| USB Connector to interface to your PC | |||||
| Connection for optional battery charger/eliminator | |||||
| Data storage capacity | 1 week of calibration procedures results | ||||
| 90 day specifications | The standard specification interval for the 750 Series are 1 and 2 years. | ||||
| Typical 90 day measurement and source accuracy can be estimated by dividing the one year "% of reading" or "% of output" specifications by 2. | |||||
| Floor specifications, expressed as "% of full scale" or "counts" or "ohms" remain constant. | |||||
| Temperature, Resistance Temperature Detectors | |||||
| Degrees or % of reading - Type (α) | Range °C | Measure °C1 | |||
| 1 year | 2 year | ||||
| 100 Ω Pt (385) | -200 to 100 100 to 800 |
0.07°C 0.02% + 0.05°C |
0.14°C 0.04% + 0.10°C |
||
| 200 Ω Pt (385) | -200 to 100 100 to 630 |
0.07°C 0.02% + 0.05°C |
0.14°C 0.04% + 0.10°C |
||
| 500 Ω Pt (385) | -200 to 100 100 to 630 |
0.07°C 0.02% + 0.05°C |
0.14°C 0.04% + 0.10°C |
||
| 1000 Ω Pt (385) | -200 to 100 100 to 630 |
0.07°C 0.02% + 0.05°C |
0.14°C 0.04% + 0.10°C |
||
| 100 Ω Pt (3916) | -200 to 100 100 to 630 |
0.07°C 0.02% + 0.05°C |
0.14°C 0.04% + 0.10°C |
||
| 100 Ω Pt (3926) | -200 to 100 100 to 630 |
0.08°C 0.02% + 0.06°C |
0.16°C 0.04% + 0.12°C |
||
| 10 Ω Cu (427) | -100 to 260 | 0.2°C | 0.4°C | ||
| 120 Ω Ni (672) | -80 to 260 | 0.1°C | 0.2°C | ||
| Source current | Source °C | Allowable current2 | |||
| 1 year | 2 year | ||||
| 1 mA | 0.05°C 0.0125% + 0.04°C |
0.10°C 0.025% + 0.08°C |
0.1 mA to 10 mA | ||
| 500 μA | 0.06°C 0.017% + 0.05°C |
0.12°C 0.034% + 0.10°C |
0.1 mA to 1 mA | ||
| 250 μA | 0.06°C 0.017% + 0.05°C |
0.12°C 0.034% + 0.10°C |
0.1 mA to 1 mA | ||
| 150 μA | 0.06°C 0.017% + 0.05°C |
0.12°C 0.034% + 0.10°C |
0.1 mA to 1 mA | ||
| 1 mA | 0.05°C 0.0125% + 0.04°C |
0.10°C 0.025% + 0.08°C |
0.1 mA to 10 mA | ||
| 1 mA | 0.05°C 0.0125% + 0.04°C |
0.10°C 0.025% + 0.08°C |
0.1 mA to 10 mA | ||
| 3 mA | 0.2°C | 0.4°C | 0.1 mA to 10 mA | ||
| 1 mA | 0.04°C | 0.08°C | 0.1 mA to 10 mA | ||
| 1. For two and three-wire RTD measurements, add 0.4°C to the specifications. 2. Supports pulsed transmitters and PLCs with pulse times as short as 1 ms |
|||||
| Temperature, Thermocouples | |||||
| Type | Source °C | Measure °C | Source °C | ||
| 1 year | 2 years | 1 year | 2 years | ||
| E | -250 to -200 | 1.3 | 2.0 | 0.6 | 0.9 |
| -200 to -100 | 0.5 | 0.8 | 0.3 | 0.4 | |
| -100 to 600 | 0.3 | 0.4 | 0.3 | 0.4 | |
| 600 to 1000 | 0.4 | 0.6 | 0.2 | 0.3 | |
| N | -200 to -100 | 1.0 | 1.5 | 0.6 | 0.9 |
| -100 to 900 | 0.5 | 0.8 | 0.5 | 0.8 | |
| 900 to 1300 | 0.6 | 0.9 | 0.3 | 0.4 | |
| J | -210 to -100 | 0.6 | 0.9 | 0.3 | 0.4 |
| -100 to 800 | 0.3 | 0.4 | 0.2 | 0.3 | |
| 800 to 1200 | 0.5 | 0.8 | 0.3 | 0.3 | |
| K | -200 to -100 | 0.7 | 1.0 | 0.4 | 0.6 |
| -100 to 400 | 0.3 | 0.4 | 0.3 | 0.4 | |
| 400 to 1200 | 0.5 | 0.8 | 0.3 | 0.4 | |
| 1200 to 1372 | 0.7 | 1.0 | 0.3 | 0.4 | |
| T | -250 to -200 | 1.7 | 2.5 | 0.9 | 1.4 |
| -200 to 0 | 0.6 | 0.9 | 0.4 | 0.6 | |
| 0 to 400 | 0.3 | 0.4 | 0.3 | 0.4 | |
| B | 600 to 800 | 1.3 | 2.0 | 1.0 | 1.5 |
| 800 to 1000 | 1.0 | 1.5 | 0.8 | 1.2 | |
| 1000 to 1820 | 0.9 | 1.3 | 0.8 | 1.2 | |
| R | -20 to 0 | 2.3 | 2.8 | 1.2 | 1.8 |
| 0 to 100 | 1.5 | 2.2 | 1.1 | 1.7 | |
| 100 to 1767 | 1.0 | 1.5 | 0.9 | 1.4 | |
| S | -20 to 0 | 2.3 | 2.8 | 1.2 | 1.8 |
| 0 to 200 | 1.5 | 2.1 | 1.1 | 1.7 | |
| 200 to 1400 | 0.9 | 1.4 | 0.9 | 1.4 | |
| 1400 to 1767 | 1.1 | 1.7 | 1.0 | 1.5 | |
| C | 0 to 800 | 0.6 | 0.9 | 0.6 | 0.9 |
| 800 to 1200 | 0.8 | 1.2 | 0.7 | 1.0 | |
| 1200 to 1800 | 1.1 | 1.6 | 0.9 | 1.4 | |
| 1800 to 2316 | 2.0 | 3.0 | 1.3 | 2.0 | |
| L | -200 to -100 | 0.6 | 0.9 | 0.3 | 0.4 |
| -100 to 800 | 0.3 | 0.4 | 0.2 | 0.3 | |
| 800 to 900 | 0.5 | 0.8 | 0.2 | 0.3 | |
| U | -200 to 0 | 0.6 | 0.9 | 0.4 | 0.6 |
| 0 to 600 | 0.3 | 0.4 | 0.3 | 0.4 | |
| BP | 0 to 1000 | 1.0 | 1.5 | 0.4 | 0.6 |
| 1000 to 2000 | 1.6 | 2.4 | 0.6 | 0.9 | |
| 2000 to 2500 | 2.0 | 3.0 | 0.8 | 1.2 | |
| XK | -200 to 300 | 0.2 | 0.3 | 0.2 | 0.5 |
| 300 to 800 | 0.4 | 0.6 | 0.3 | 0.6 | |
Includes:
- BC7240 battery charger
- Li-on BP7240 battery pack
- DPCTrack 2™ Sample Software
- Instruction manual
- NIST-traceable calibration report and data
- Three sets of TP220 test probes with three sets of “extended tooth"" alligator clips
- Two sets AC280 hook clips
- C799 Soft Field Case
- USB communication cable
Manuals
- 753/754 | Users manual
- 753/754 | Users manual supplement
- DPC/TRACK | Users manual
- DPCTrack2 | Users manual
- 753/754 | Calibration manual
- 753/754 | Calibration manual supplement
- 753/754 | Getting started
- 753/754 | Statement of memory volatility
- 75X EL | Instruction sheet
- DPC/TRACK | Installation guide
- DPCTrack2 | Getting started
Software
| Shipping | This Item Ships from Fremantle, Perth, Western Australia |
Please allow 2 - 10 days for your order to arrive.
Although Most Stocked Products will generally Ship Overnight. We source products from all over the world to bring you epic offers and the lowest prices. This means sometimes you have to wait a little longer to get your order but it's always worth it!
Returns are easy.
simply contact us for a returns number and send your item to our returns centre for fast processing. We'll get you a replacement or refund in a snap!
Description
753 Documenting Process Calibrator, Non Bus
(Fluke Registration required before purchase. Please contact Laserman for more information on +61 8 9335 1718 )
(item no. 3977641)
Fluke 753 Documenting Process Calibrator helps you work smarter and faster
The Fluke 753 is a powerful multifunction documenting calibrator that lets you download procedures, lists, and instructions created with software, and upload data for printing, archiving, and analysis. You'll find it does the work of several tools, with simultaneous source and measurement capabilities for all common process parameters. It sources, simulates, and measures pressure, temperature, and electrical signals in one rugged, hand-held calibration tool. It also automates calibration procedures, captures data for documentation, and helps you meet rigorous standards like ISO 9000, FDA, EPA, and OSHA regulations.
The 753 includes a USB interface and a USB communication cable to enable two-way communication with DPCTrack 2 and other instrumentation management applications. To create a seamless/paperless calibration management system consider adding Fluke DPCTrack2 Calibration Management software for use with your Fluke 753 and 754 or even legacy Fluke 743 and 744 calibrators.
Features
- Full-featured documenting process calibrator for calibrating and troubleshooting
- Measures volts, mA, RTDs, thermocouples, frequency, and ohms to test sensors, transmitters and other instruments
- Sources and simulate volts, mA, pressure, thermocouples, RTDs, frequency, ohms, and pressure to calibrate transmitters
- Powers transmitters during test using loop supply with simultaneous mA measurement
- Measures and sources pressure using any of 50 Fluke 700Pxx Pressure Modules
- Allows you to creates and run automated as-found/as-left procedures to satisfy quality programs or regulations, and record and document results
- Holds up to a full week of downloaded procedures and calibration results
- Offers many flexible features like autostep, custom units, user-entered values during test, one-point and two-point switch testing, square root DP flow testing, programmable measurement delay and more.
- Offers compatibility with DPCTrack2 and many other asset management software packages
- Bright white dual display for reading both sourced and measured parameters simultaneously
- Easy-to-use multi-lingual interface
- Gas gauge and rechargeable Li-Ion battery for 10 hour uninterrupted use
- Comes with three-year warranty and DPC/Track trial software
Specifications: Fluke 753 Documenting Process Calibrator
| Measurement Accuracy | |||||
| Voltage DC | Range /Resolution | 1 Year | 2 Years | ||
| 100.000 mV | 0.02% + 0.005 mV | 0.03% + 0.005 mV | |||
| 3.00000 V | 0.02% + 0.00005 V | 0.03% + 0.00005 V | |||
| 30.0000 V | 0.02% + 0.0005 V | 0.03% + 0.0005 V | |||
| 300.00 V | 0.05% + 0.05 V | 0.07% + 0.05 V | |||
| Voltage AC | 3.000 V (40 Hz to 500 Hz) / 0.001 V | 0.5% + 0.002 V | 1.0% + 0.004 V | ||
| 30.00 V (40 Hz to 500 Hz) / 0.01 V | 0.5% + 0.02 V | 1.0% + 0.04 V | |||
| 300.0 V (40 Hz to 500 Hz) / 0.1 V | 0.5% + 0.2 V | 1.0% + 0.2 V | |||
| Current DC | 30.000 mA | 0.01% + 5 uA | 0.015% + 7 uA | ||
| 110.00 mA | 0.01% + 20 uA | 0.015% + 30 uA | |||
| Resistance | 10.000 Ω | 0.05% + 50 mΩ | 0.07% + 70 mΩ | ||
| 100.00 Ω | 0.05% + 50 mΩ | 0.07% + 70 mΩ | |||
| 1.0000 kΩ | 0.05% + 500 mΩ | 0.07% + 0.5 Ω | |||
| 10.000 kΩ | 0.1% + 10 Ω | 0.15% + 15 Ω | |||
| Frequency | 1.00 to 110.00 Hz / 0.01 Hz | 0.05 Hz | |||
| 110.1 to 1100.0 Hz / 0.1 Hz | 0.5 Hz | ||||
| 1.101 to 11.000 kHz / 0.001 kHz | 0.005 kHz | ||||
| 11.01 to 50.00 kHz / 0.01 kHz | 0.05 kHz | ||||
| Source Accuracy | |||||
| 1 Year | 2 Years | ||||
| Voltage DC | 100.000 mV | 0.01% + 0.005 mV | 0.015% + 0.005 mV | ||
| 1.00000 V | 0.01% + 0.00005 V | 0.015% + 0.0005 V | |||
| 15.0000 V | 0.01% + 0.0005 V | 0.015% + 0.0005 V | |||
| Current DC | 22.000 mA (source) | 0.01% + 0.003 mA | 0.02% + 0.003 mA | ||
| Current sink (simulate) | 0.02% + 0.007 mA | 0.04% + 0.007 mA | |||
| Resistance | 10.000 Ω | 0.01% + 10 mΩ | 0.015% + 15 mΩ | ||
| 100.00 Ω | 0.01% + 20 mΩ | 0.015% + 30 mΩ | |||
| 1.0000 kΩ | 0.02% + 0.2 Ω | 0.03% + 0.3 Ω | |||
| 10.000 kΩ | 0.02% + 3 Ω | 0.03% + 5 Ω | |||
| Frequency | 0.1 to 10.99 Hz | 0.01 Hz | |||
| 0.01 to 10.99 Hz | 0.01 Hz | ||||
| 11.00 to 109.99 Hz | 0.1 Hz | ||||
| 110.0 to 1099.9 Hz | 0.1 Hz | ||||
| 1.100 to 21.999 kHz | 0.002 kHz | ||||
| 22.000 to 50.000 kHz | 0.005 kHz | ||||
| Technical Data | |||||
| Data log functions | Measure functions | Voltage, current, resistance, frequency, temperature, pressure | |||
| Reading rate | 1, 2, 5, 10, 20, 30, or 60 readings/minute | ||||
| Maximum record length | 8000 readings (7980 for 30 or 60 readings/minute) | ||||
| Ramp functions | Source functions | Voltage, current, resistance, frequency, temperature | |||
| Rate | 4 steps/second | ||||
| Trip detect | Continuity or voltage (continuity detection not available when sourcing current) | ||||
| Loop power function | Voltage | Selectable, 26 V | |||
| Accuracy | 10%, 18 V minimum at 22 mA | ||||
| Maximum current | 25 mA, short circuit protected | ||||
| Maximum input voltage | 50 V DC | ||||
| Step functions | Source functions | Voltage, current, resistance, frequency, temperature | |||
| Manual step | Selectable step, change with arrow buttons | ||||
| Autostep | Fully programmable for function, start delay, stepvalue, time per step, repeat | ||||
| Environmental Specifications | |||||
| Operating temperature | -10°C to +50°C | ||||
| Storage temperature | -20°C to +60°C | ||||
| Dust/water resistance | Meets IP52, IEC 529 | ||||
| Operating altitude | 3000 m above mean sea level (9842 ft) | ||||
| Safety Specifications | |||||
| Agency approvals | CAN/CSA C22.2 No 1010.1-92, ASNI/ISA S82.01-1994, UL3111, and EN610-1:1993 | ||||
| Mechanical and General Specifications | |||||
| Size | 136 x 245 x 63 mm (5.4 x 9.6 x 2.5 in) | ||||
| Weight | 1.2 kg (2.7 lb) | ||||
| Batteries | Internal Battery Pack Li-ion: 7.2 V, 4400 mAh, 30 Wh | ||||
| Battery life | > 8 hours typical | ||||
| Battery replacement | Via snap-shut door without opening calibrator; no tools required | ||||
| Side port connections | Pressure module connector | ||||
| USB Connector to interface to your PC | |||||
| Connection for optional battery charger/eliminator | |||||
| Data storage capacity | 1 week of calibration procedures results | ||||
| 90 day specifications | The standard specification interval for the 750 Series are 1 and 2 years. | ||||
| Typical 90 day measurement and source accuracy can be estimated by dividing the one year "% of reading" or "% of output" specifications by 2. | |||||
| Floor specifications, expressed as "% of full scale" or "counts" or "ohms" remain constant. | |||||
| Temperature, Resistance Temperature Detectors | |||||
| Degrees or % of reading - Type (α) | Range °C | Measure °C1 | |||
| 1 year | 2 year | ||||
| 100 Ω Pt (385) | -200 to 100 100 to 800 |
0.07°C 0.02% + 0.05°C |
0.14°C 0.04% + 0.10°C |
||
| 200 Ω Pt (385) | -200 to 100 100 to 630 |
0.07°C 0.02% + 0.05°C |
0.14°C 0.04% + 0.10°C |
||
| 500 Ω Pt (385) | -200 to 100 100 to 630 |
0.07°C 0.02% + 0.05°C |
0.14°C 0.04% + 0.10°C |
||
| 1000 Ω Pt (385) | -200 to 100 100 to 630 |
0.07°C 0.02% + 0.05°C |
0.14°C 0.04% + 0.10°C |
||
| 100 Ω Pt (3916) | -200 to 100 100 to 630 |
0.07°C 0.02% + 0.05°C |
0.14°C 0.04% + 0.10°C |
||
| 100 Ω Pt (3926) | -200 to 100 100 to 630 |
0.08°C 0.02% + 0.06°C |
0.16°C 0.04% + 0.12°C |
||
| 10 Ω Cu (427) | -100 to 260 | 0.2°C | 0.4°C | ||
| 120 Ω Ni (672) | -80 to 260 | 0.1°C | 0.2°C | ||
| Source current | Source °C | Allowable current2 | |||
| 1 year | 2 year | ||||
| 1 mA | 0.05°C 0.0125% + 0.04°C |
0.10°C 0.025% + 0.08°C |
0.1 mA to 10 mA | ||
| 500 μA | 0.06°C 0.017% + 0.05°C |
0.12°C 0.034% + 0.10°C |
0.1 mA to 1 mA | ||
| 250 μA | 0.06°C 0.017% + 0.05°C |
0.12°C 0.034% + 0.10°C |
0.1 mA to 1 mA | ||
| 150 μA | 0.06°C 0.017% + 0.05°C |
0.12°C 0.034% + 0.10°C |
0.1 mA to 1 mA | ||
| 1 mA | 0.05°C 0.0125% + 0.04°C |
0.10°C 0.025% + 0.08°C |
0.1 mA to 10 mA | ||
| 1 mA | 0.05°C 0.0125% + 0.04°C |
0.10°C 0.025% + 0.08°C |
0.1 mA to 10 mA | ||
| 3 mA | 0.2°C | 0.4°C | 0.1 mA to 10 mA | ||
| 1 mA | 0.04°C | 0.08°C | 0.1 mA to 10 mA | ||
| 1. For two and three-wire RTD measurements, add 0.4°C to the specifications. 2. Supports pulsed transmitters and PLCs with pulse times as short as 1 ms |
|||||
| Temperature, Thermocouples | |||||
| Type | Source °C | Measure °C | Source °C | ||
| 1 year | 2 years | 1 year | 2 years | ||
| E | -250 to -200 | 1.3 | 2.0 | 0.6 | 0.9 |
| -200 to -100 | 0.5 | 0.8 | 0.3 | 0.4 | |
| -100 to 600 | 0.3 | 0.4 | 0.3 | 0.4 | |
| 600 to 1000 | 0.4 | 0.6 | 0.2 | 0.3 | |
| N | -200 to -100 | 1.0 | 1.5 | 0.6 | 0.9 |
| -100 to 900 | 0.5 | 0.8 | 0.5 | 0.8 | |
| 900 to 1300 | 0.6 | 0.9 | 0.3 | 0.4 | |
| J | -210 to -100 | 0.6 | 0.9 | 0.3 | 0.4 |
| -100 to 800 | 0.3 | 0.4 | 0.2 | 0.3 | |
| 800 to 1200 | 0.5 | 0.8 | 0.3 | 0.3 | |
| K | -200 to -100 | 0.7 | 1.0 | 0.4 | 0.6 |
| -100 to 400 | 0.3 | 0.4 | 0.3 | 0.4 | |
| 400 to 1200 | 0.5 | 0.8 | 0.3 | 0.4 | |
| 1200 to 1372 | 0.7 | 1.0 | 0.3 | 0.4 | |
| T | -250 to -200 | 1.7 | 2.5 | 0.9 | 1.4 |
| -200 to 0 | 0.6 | 0.9 | 0.4 | 0.6 | |
| 0 to 400 | 0.3 | 0.4 | 0.3 | 0.4 | |
| B | 600 to 800 | 1.3 | 2.0 | 1.0 | 1.5 |
| 800 to 1000 | 1.0 | 1.5 | 0.8 | 1.2 | |
| 1000 to 1820 | 0.9 | 1.3 | 0.8 | 1.2 | |
| R | -20 to 0 | 2.3 | 2.8 | 1.2 | 1.8 |
| 0 to 100 | 1.5 | 2.2 | 1.1 | 1.7 | |
| 100 to 1767 | 1.0 | 1.5 | 0.9 | 1.4 | |
| S | -20 to 0 | 2.3 | 2.8 | 1.2 | 1.8 |
| 0 to 200 | 1.5 | 2.1 | 1.1 | 1.7 | |
| 200 to 1400 | 0.9 | 1.4 | 0.9 | 1.4 | |
| 1400 to 1767 | 1.1 | 1.7 | 1.0 | 1.5 | |
| C | 0 to 800 | 0.6 | 0.9 | 0.6 | 0.9 |
| 800 to 1200 | 0.8 | 1.2 | 0.7 | 1.0 | |
| 1200 to 1800 | 1.1 | 1.6 | 0.9 | 1.4 | |
| 1800 to 2316 | 2.0 | 3.0 | 1.3 | 2.0 | |
| L | -200 to -100 | 0.6 | 0.9 | 0.3 | 0.4 |
| -100 to 800 | 0.3 | 0.4 | 0.2 | 0.3 | |
| 800 to 900 | 0.5 | 0.8 | 0.2 | 0.3 | |
| U | -200 to 0 | 0.6 | 0.9 | 0.4 | 0.6 |
| 0 to 600 | 0.3 | 0.4 | 0.3 | 0.4 | |
| BP | 0 to 1000 | 1.0 | 1.5 | 0.4 | 0.6 |
| 1000 to 2000 | 1.6 | 2.4 | 0.6 | 0.9 | |
| 2000 to 2500 | 2.0 | 3.0 | 0.8 | 1.2 | |
| XK | -200 to 300 | 0.2 | 0.3 | 0.2 | 0.5 |
| 300 to 800 | 0.4 | 0.6 | 0.3 | 0.6 | |
Includes:
- BC7240 battery charger
- Li-on BP7240 battery pack
- DPCTrack 2™ Sample Software
- Instruction manual
- NIST-traceable calibration report and data
- Three sets of TP220 test probes with three sets of “extended tooth"" alligator clips
- Two sets AC280 hook clips
- C799 Soft Field Case
- USB communication cable
Manuals
- 753/754 | Users manual
- 753/754 | Users manual supplement
- DPC/TRACK | Users manual
- DPCTrack2 | Users manual
- 753/754 | Calibration manual
- 753/754 | Calibration manual supplement
- 753/754 | Getting started
- 753/754 | Statement of memory volatility
- 75X EL | Instruction sheet
- DPC/TRACK | Installation guide
- DPCTrack2 | Getting started
Software
Shipping
| Shipping | This item ships to |
Delivery & Returns
Please allow 2 - 10 days for your order to arrive.
Although Most Stocked Products will generally Ship Overnight. We source products from all over the world to bring you epic offers and the lowest prices. This means sometimes you have to wait a little longer to get your order but it's always worth it!
Returns are easy.
simply contact us for a returns number and send your item to our returns centre for fast processing. We'll get you a replacement or refund in a snap!
6 Great reasons to buy from us:
-

30 Days Return
If your product is faulty or damaged under manufacture warranty, simply send it back to us and we'll cheerfully replace it or fix the problem for you. -

Returns are Easy
Simply contact us for a returns number and send your item to our returns centre for fast processing. We'll get you a replacement or refund in a snap! -

Best Price Guarantee
In the unlikely event that you find your item cheaper at another online store, just let us know and we'll beat the competitor's pricing hands-down. -

We guarantee your satisfaction
We insist that you love everything you buy from us. If you're unhappy for any reason whatsoever, just let us know and we'll bend over backwards to make things right again. -

100% Safe & Secure
Ordering from Laserman Technologies is 100% safe and secure so you can rest easy. Your personal details are never shared, sold or rented to anyone either. -

Best Laser Warranties in the Business
Laserman the Best Laser Level, Pipe Laser and Laser Measuring Warranties in the Business - Now thats unbeatable value !!.


